Flutter is a cross-platform UI framework developed by Google. Initially, flutter was started as a UI framework for android and iOS. But with time, flutter is expanded to cover all the major desktop operating systems and web browsers.
Now I think the obvious question that comes to your mind is, don’t we have a native framework and language for each platform. For example, android has java and Kotlin, iOS have swift and c#. The apps made with those techs are very performant and run smoothly on their respective platform. They also follow some platform-specific design guidelines. This helps users quickly learn to use a new app.
But with flutter, we don’t have any design restrictions, the app performance is not as per the native apps. So why do we bother to use flutter? Yes, this is a genuine question one can ask before learning flutter.
My take on this is flutter provides a good developer experience. Yes, it is not as performant as the native one, but we are heading this way. Also, the primary reason to use flutter is its platform independence. You just have to write once and deploy anywhere it supports.
In 2022, if you are looking for a truly cross-platform framework for your product or startups, then flutter would be the right choice for you.
After writing and building the flutter application, app deployment and distribution is a cumbersome process for a developer. Whether it is a team or a solo project, we developers love to code. We want to make a product. We don’t want to deal with deployment and distribution.
There are many moving parts involved in app deployment. Whether it is google play store or apple App Store, one human error can lose all your hard work. To solve this issue, modern software developers use continuous integration and delivery (CI/CD) to automate this app testing and deployment process.
Codemagic is such a service that you can use to integrate a (CI/CD) pipeline into your workflow. If abstract out all your complexities and give you a much smoother development and deployment experience. Click here to register for free and start deploying with codemagic.
Agenda of the article
In this article, we are going to build a flutter app from scratch. Then write some tests to test the core logic of the app. After that, we hook the codemagic CI/CD pipeline to make a release build of our app. Finally, we set up continuous deployment of our app to the google play store with the help of codemagic.
The brief point-wise agenda of this article is as follows :
- Create a flutter app
- Pull some data from a remote API and display it inside our app
- Test the core logic with unit test and mocking the API request
- Build our app for deployment with codemagic
- Automate deployment with codemagic to the google play store
Build a flutter app
Before starting, let’s create a new flutter project. Use the --org tag for defining the package name of your app. The package name of your app is a unique identifier for your app. This will help you to push the update to your app and distinguish and support the legitimacy of your application.
Defining the package name at the start makes our life a lot easier during deployment. Otherwise, you have to go files after files to change your package name before building of your app.
For package names, you should use a unique domain name. If your domain name is example.com, then you have to put com.example as your package name.
# Change com.example to your unique domain name
flutter create --org com.example codemagicdemo
Fetch data from API
Now your project is up and running. You can verify this by simply running flutter run command inside your terminal. This command will launch a debug version of your app inside any device of your choice.
Our primary task in this guide is to fetch some data from a remote API. Then we process the API response and display it inside our app. The API response contains a list of authors, along with their author details, their names, description and a Wikipedia link, etc.
If you paste this link into your browser, you will see what the API response looks like.
To consume this data inside out app, we have to decode the response with jsonDecode() and hook it with some dart classes for ease of use.
At first, we make an AuthorList class. It wraps all the json fields we need from the API response.
Create a file called author_list.dart. Here we define the aforementioned class. The fields inside AuthorList look like this.
class AuthorList {
  final int count;
  final int totalCount;
  final int page;
  final int totalPage;
  final List<Author> results;

  const AuthorList({
    required this.count,
    required this.totalCount,
    required this.page,
    required this.totalPage,
    required this.results,
   });
}
As you can see, in the results field, we use a list of a custom type called Author. This class wrap all the json response field we need for an individual author.
To define the Author class, create a file called author.dart. The fields inside the Author class look something like this.
class Author {
  final String id;
  final String name;
  final String slug;
  final String bio;
  final String description;
  final int quoteCount;
  final String link;
  final String dateAdded;
  final String dateModified;

  const Author({
    required this.id,
    required this.name,
    required this.slug,
    required this.bio,
    required this.description,
    required this.quoteCount,
    required this.link,
    required this.dateAdded,
    required this.dateModified,
    });
}
We are done with making all the dart wrappers for the API response. Now Let’s fetch the data from the API.
Create a file called network_service.dart. All our networking logic goes inside this file. In this example, I use the standard http package to make the network request.
To install this package, at the root of your project, run this command.
flutter pub add http
Then create a NetworkService class. Inside this NetworkService class we define fetchAuthorList() method. This method will be responsible for calling and decoding all the API requests.
After we get the response from the server, if the response status code is 200, we decode this response with jsonDecode() function. Then we hook the json data into our previously made AuthorList and Author class (or object).
At this point, the code inside the NetworkService looks something like this.
import 'dart:convert';
import 'package:codemagicdemo/src/data/author.dart';
import 'package:http/http.dart' as http;
import './author_list.dart';

class NetworkService {

  final String baseurl = "https://quotable.io";

  Future<AuthorList> fetchAuthorList() async {
    http.Response response = await http.get(
      Uri.parse("$baseurl/authors"),
    );

    if (response.statusCode == 200) {
      Map<String, dynamic> decodedResult =
      jsonDecode(response.body);

      return AuthorList(
        count: decodedResult["count"],
        totalCount: decodedResult["totalCount"],
        page: decodedResult["page"],
        totalPage: decodedResult["totalPages"],
        results: (decodedResult["results"] as List)
            .map(
              (e) => Author(
                id: e["_id"],
                name: e["name"],
                slug: e["slug"],
                bio: e["bio"],
                description: e["description"],
                quoteCount: e["quoteCount"],
                link: e["link"],
                dateAdded: e["dateAdded"],
                dateModified: e["dateModified"],
              ),
            )
            .toList(),
        );
        } else {
          throw Exception("Failed to load Author list");
        }
    }
}
Building the UI
For now, the network service section is over. Let’s focus on building a beautiful UI for our app.
UI is the part with which our user interacts. So making it good and polished makes the user experience better.
We make 2 screens. The first one is the home screen. Here we display all the authors as a list inside a ListView. When the user clicks on any of the list items, a second screen will open.
The second screen consists of details of individual authors with their Images.
The final app will look like this.

Let’s build the home screen first. Make a scaffold inside a stateful widget. Inside the body of the scaffold, we define a FutureBuilder. This FutureBuilder listen for the API response. When the Network_service finished processing the API response, it renders the AuthorList as a ListView on the Homescreen.
The complete code of the homepage looks like this.
import 'package:flutter/material.dart';
import '../data/network_service.dart';
import '../data/author_list.dart';
import '../widgets/custom_listile.dart';

class Homepage extends StatefulWidget {
  const Homepage({Key? key}) : super(key: key);

  @override
  State<Homepage> createState() => _HomepageState();
}

class _HomepageState extends State<Homepage> {

  late Future<AuthorList> authorList;

  @override
  void initState() {
    authorList = NetworkService().fetchAuthorList();
    super.initState();
  }

  @override
  Widget build(BuildContext context) {
    return Scaffold(
      appBar: AppBar(
        title: const Text("Authors"),
        ),
        body: FutureBuilder<AuthorList>(
          future: authorList,
            builder: (context, snapShot) {
              if (snapShot.hasData) {
                return ListView.builder(
                  itemCount: snapShot.data?.count,
                  itemBuilder: ((context, index) => CustomListTile(
                    author: snapShot.data!.results[index],
                   )),
                  );
                 }
                return Center(
                  child: CircularProgressIndicator(
                    color: Theme.of(context).primaryColor,
                  ),
                );
              },
            ),
        );
       }
}
On the homepage, every author is displayed as a list element inside a CustomListTile. This CustomListTile is just a regular ListTile with a bit of customization on top of it. when we click on the CustomListTile, it takes us to the second screen. we name the second screen as author_detail_page.dart.
The code inside the CustomListTile is as follows.
import 'package:flutter/material.dart';
import '../data/author.dart';
import '../pages/author_detail_page.dart';

class CustomListTile extends StatelessWidget {
  final Author author;
  const CustomListTile({Key? key, required this.author}) : super(key:
  key);

  @override
  Widget build(BuildContext context) {
    return Container(
      margin: const EdgeInsets.symmetric(horizontal: 10, vertical: 10),
      child: ListTile(
        contentPadding: const EdgeInsets.symmetric(vertical: 7,
        horizontal: 15),
        shape: RoundedRectangleBorder(
          side: const BorderSide(
            color: Color(0xFFEFEFEF),
            width: 1,
            style: BorderStyle.solid,
            ),
          borderRadius: BorderRadius.circular(5),
        ),
        enableFeedback: true,
        tileColor: Theme.of(context).backgroundColor,
        leading: CircleAvatar(
          backgroundColor: Theme.of(context).primaryColor,
          child: Icon(
            Icons.account_circle_outlined,
            color: Theme.of(context).primaryIconTheme.color,
           ),
         ),
        trailing: Icon(
          Icons.arrow_forward_rounded,
          color: Theme.of(context).primaryIconTheme.color,
         ),
         title: Text(author.name),
         onTap: () {
           Navigator.push(
             context,
             MaterialPageRoute(
               builder: (_) => AuthorDetailsPage(
                 author: author,
             ),
           ),
          );
        },
      ),
    );
  }
}
Inside the author_detail_page.dart we need to render the image of the individual author. We can get the author image from an API with the help of a slug associated with Author object. The URL for the image will look like this: https://images.quotable.dev/profile/400/{slug}.jpg.
The process is simple. Just manipulate the image URL with the individual author slug and add the URL inside a network image widget. flutter will do the rest for us.
Get the author’s image
Now let’s go back to our network_service.dart file. Inside the NetworkService class, add another method called authorImageLink(). This method takes the slug of an individual author and gives us the required image link.
After all that set up, our final network_service.dart file looks something like this.
import 'dart:convert';
import 'package:codemagicdemo/src/data/author.dart';
import 'package:http/http.dart' as http;
import './author_list.dart';

class NetworkService {

  final String baseurl = "https://quotable.io";
  final String imageBaseUrl =
    "https://images.quotable.dev/profile/400/";

  String authorImageLink({required String slug}) {
    return "$imageBaseUrl$slug.jpg";
  }

  Future<AuthorList> fetchAuthorList() async {
    http.Response response = await http.get(
      Uri.parse("$baseurl/authors"),
    );

    if (response.statusCode == 200) {
      Map<String, dynamic> decodedResult =
      jsonDecode(response.body);

      return AuthorList(
        count: decodedResult["count"],
        totalCount: decodedResult["totalCount"],
        page: decodedResult["page"],
        totalPage: decodedResult["totalPages"],
        results: (decodedResult["results"] as List)
            .map(
              (e) => Author(
                id: e["_id"],
                name: e["name"],
                slug: e["slug"],
                bio: e["bio"],
                description: e["description"],
                quoteCount: e["quoteCount"],
                link: e["link"],
                dateAdded: e["dateAdded"],
                dateModified: e["dateModified"],
              ),
            )
            .toList(),
        );
        } else {
          throw Exception("Failed to load Author list");
        }
    }
}
Then inside the author_detail_page we call this authorImageLink() method inside a NetworkImage with the required slug and then the image is displayed on the screen. As a grain of salt, I add the image loading progress percentage with the loadingBuilder argument in NetworkImage. This gives a nice look to our app.
Last but not least, remember we have a Wikipedia link for each author. Now I use a package called url_launcher to launch the Wikipedia link from the app.
To add this package to your app, run the following command.
flutter pub add url_launcher
Till now both of our screens are completed. The code snippets of the second screen is:
import 'package:flutter/material.dart';
import 'package:url_launcher/url_launcher.dart';
import '../data/author.dart';
import '../data/network_service.dart';

class AuthorDetailsPage extends StatefulWidget {
  final Author author;

  const AuthorDetailsPage({Key? key, required this.author}) : super(key:
    key);

  @override
  State<AuthorDetailsPage> createState() => _AuthorDetailsPageState();
}

class _AuthorDetailsPageState extends State<AuthorDetailsPage> {

  @override
  Widget build(BuildContext context) {
  return Scaffold(
  appBar: AppBar(
    title: const Text("Details"),
  ),
  body: Container(
    width: double.maxFinite,
    margin: const EdgeInsets.symmetric(horizontal: 10, vertical: 10),
    decoration: BoxDecoration(
      color: Theme.of(context).backgroundColor,
      borderRadius: BorderRadius.circular(5),
    ),
    child: Column(
      mainAxisAlignment: MainAxisAlignment.start,
      crossAxisAlignment: CrossAxisAlignment.center,
      mainAxisSize: MainAxisSize.min,
      children: [
        const SizedBox(height: 20),
        Image.network(
          NetworkService().authorImageLink(slug: widget.author.slug),
          frameBuilder: ((context, child, frame, wasSynchronouslyLoaded)
           { return Container(
               height: 100,
               width: 100,
               decoration: BoxDecoration(
                 shape: BoxShape.circle,
                 border: Border.all(
                   color: Theme.of(context).primaryColor, width: 4),
                   ),
               child: ClipOval(
                 child: child,
                ),
              );
             }),
          loadingBuilder: (context, child, loadingProgress) {
            if (loadingProgress != null) {
              double loadingpercent =
                loadingProgress.cumulativeBytesLoaded /
                loadingProgress.expectedTotalBytes!.toInt();
              if (loadingpercent < 1) {
                return Container(
                   decoration: BoxDecoration(
                     shape: BoxShape.circle,
                     border: Border.all(
                       color: Theme.of(context).primaryColor, width: 4),
                      ),
                   height: 100,
                   width: 100,
                   child: Center(
                     child: Text("${(loadingpercent *
                        100).toStringAsFixed(2)} %",
                       style:
                Theme.of(context).primaryTextTheme.displayMedium,
                     ),
                    ),
                   );
                  }
                }
              return child;
                 },
                ),
        const SizedBox(height: 20),
        Text( widget.author.name,
          style: Theme.of(context).primaryTextTheme.titleMedium,),
        const SizedBox(height: 5),
        Text( widget.author.description,
          style: Theme.of(context).primaryTextTheme.titleSmall,
          ),
         const SizedBox(height: 20),
         Padding(
           padding: const EdgeInsets.symmetric(horizontal: 20),
           child: Text( widget.author.bio,
           style: Theme.of(context).textTheme.bodyMedium,
           textAlign: TextAlign.center,
           ),
        ),
         const SizedBox(height: 40),
           TextButton(
             onPressed: () {
               launchUrl(
                 Uri.parse(widget.author.link),
                );
               },
            child: const Text("Know more"),
            ),
         const SizedBox(height: 10),
         ],
       ),
     ),
   );
  }
}
The project structure of the app inside the lib/ folder looks something like this. You can also see the Github repository for this project here.
.
├── generated_plugin_registrant.dart
├── main.dart
└── src
    ├── app.dart
    ├── data
    │   ├── author.dart
    │   ├── author_list.dart
    │   └── network_service.dart
    ├── pages
    │   ├── author_detail_page.dart
    │   └── homepage.dart
    └── widgets
        └── custom_listile.dart
Write some tests
In this article, we are only going to write unit tests. Unit tests are very small tests inside our app to check the core logic of our app. The is the simplest one and very easy to maintain.
As we are working with live data, and remote data is very unpredictable, we will use a mocking library to mock the API response. This will help to make our unit test faster and also help us to reduce unintended test fails.
For mocking, we use mocktail package. A lot of guides and even flutter official documentation recommend using the mockito package for mocking data. But this involves a code generation step which I don’t like.
I use mocktail and like it (a bit biased). You can use whatever you want. It is as per your choice.
If you are very new to flutter and don’t know how to write tests in a flutter, follow this official guide.
Test Network service
To test the network service, make a new file network_service_test.dart inside the test/ directory at the project root. Inside the file, let’s mock the NetworkService class. for that write
import 'package:mocktail/mocktail.dart';

class MockNetworkService extends Mock implements NetworkService {}
Inside the main function, we define the mockservice variable. Then we write a setup function. This function runs before every test. Inside the setup function, we initialize the mock network service.
void main(){
  late MockNetworkService mockservice;

  setUp(() {
    mockservice = MockNetworkService();
  });
}
At first, we test if we can invoke the fetch_author function. For that, the test would look like
test("Test if fetch author function is invoked", () {
  when(() => mockservice.fetchAuthorList())
    .thenAnswer((_) async => authorList);

  verifyNever(() => mockservice.fetchAuthorList());
  mockservice.fetchAuthorList();
  verify(() => mockservice.fetchAuthorList()).called(1);
  });
});
when, verify, verifyNever functions are coming from the mocktail package. Click here to know more.
Then we will test the if fetchAuthor function returns an author list. For that, first we have to define an author list as a mock. the list will look like this.
AuthorList authorList = const AuthorList(
  count: 20,
  totalCount: 700,
  page: 1,
  totalPage: 35,
  results: [
    Author(
    id: "yBDYq_Vtnuw",
    name: "A. A. Milne",
    slug: "a-a-milne",
    bio: "Alan Alexander Milne (18 January 1882 31 January 1956) was an
       English author, best known for his",
    description: "British author",
    quoteCount: 2,
    link: "https://en.wikipedia.org/wiki/A._A._Milne",
    dateAdded: "2019-08-08",
    dateModified: "2019-08-08")
  ],
);
Then our test code snippets will be,
test("Test to see if fetch author list returns", () async {
  when(() => mockservice.fetchAuthorList())
    .thenAnswer((_) async => authorList);
  AuthorList actualAuthorList = await mockservice.fetchAuthorList();
  expect(actualAuthorList, authorList);
});
At last, we will test if our authorImageLink method returns a usable link to render in the network image widget.
test("If author image link is reachable", () {
  when(() => mockservice.authorImageLink(slug: "a-a-milne"))
    .thenReturn("https://images.quotable.dev/profile/400/a-a-
       milne.jpg");
  expect(mockservice.authorImageLink(slug: "a-a-milne"),
    "https://images.quotable.dev/profile/400/a-a-milne.jpg");
  }
);
Till now all our 3 unit tests completed. As all of the tests are related to the NetworkService class, we can group them inside a single group. The complete code inside network_service_test.dart will be,
import 'package:codemagicdemo/src/data/author.dart';
import 'package:codemagicdemo/src/data/author_list.dart';
import 'package:codemagicdemo/src/data/network_service.dart';
import 'package:flutter_test/flutter_test.dart';
import 'package:mocktail/mocktail.dart';

class MockNetworkService extends Mock implements NetworkService {}

void main() {
  AuthorList authorList = const AuthorList(
    count: 20,
    totalCount: 700,
    page: 1,
    totalPage: 35,
    results: [
      Author(
          id: "yBDYq_Vtnuw",
          name: "A. A. Milne",
          slug: "a-a-milne",
          bio:
              "Alan Alexander Milne (18 January 1882 31 January 1956) was an English author, best known for his",
          description: "British author",
          quoteCount: 2,
          link: "https://en.wikipedia.org/wiki/A._A._Milne",
          dateAdded: "2019-08-08",
          dateModified: "2019-08-08")
    ],
  );

  late MockNetworkService mockservice;

  setUp(() {
    mockservice = MockNetworkService();
  });

  group("test http call to the network", () {
    test("Test if fetch author function is invoked", () {
      when(() => mockservice.fetchAuthorList())
          .thenAnswer((_) async => authorList);
      verifyNever(() => mockservice.fetchAuthorList());
      mockservice.fetchAuthorList();
      verify(() => mockservice.fetchAuthorList()).called(1);
    });
  });

  test("Test to see if fetch author list returns", () async {
    when(() => mockservice.fetchAuthorList())
        .thenAnswer((_) async => authorList);
    AuthorList actualAuthorList = await mockservice.fetchAuthorList();
    expect(actualAuthorList, authorList);
  });

  test("If author image link is reachable", () {
    when(() => mockservice.authorImageLink(slug: "a-a-milne"))
        .thenReturn("https://images.quotable.dev/profile/400/a-a-milne.jpg");

    expect(mockservice.authorImageLink(slug: "a-a-milne"),
        "https://images.quotable.dev/profile/400/a-a-milne.jpg");
  });
}
Always try to write an elaborate description of tests. This will help you to debug your code faster and become very easy to understand, what is going on inside the tests.
To run the test, you can use the small run button displayed at the top of the test function inside VSCode. Or if you are a terminal guy like me, you can run the following command.
flutter test test/network_service_test.dart
Deploy with codemagic
Till now all our app building and testing phases are done. It feels relaxing right. Now one last task is due and then we are all done after that. Congratulations !!
If you want, take a break, and have some coffee. If you like, you can also buy me a coffee. You are appreciated 😉.
Push to Github (or Gitlab, Bitbucket etc)
Once you are done writing your app, commit all of your changes. Navigate to your project root and run
git add .git commit -m"Your commit message"
Then create a new repository on GitHub. Copy the http link of the repository. Then run
git branch -M maingit remote add origin <http link of your repo>git push -u origin main
After running these commands, refresh your newly created Github repository to see your project files.
Make a release build with codemagic
To make a release build of our app, just follow the official flutter guide till the reviewing Gradle build configuration.
Then log in to the codemagic dashboard. If you don’t have an account, make one with GitHub sign-in. This makes your life easier and pulls your flutter project from the GitHub repo easily.

If you are a new user, codemagic will show you a getting started screen. You can choose your flutter project repository. Then select the Flutter project (with workflow editor) option. Then a new workflow editor will open.
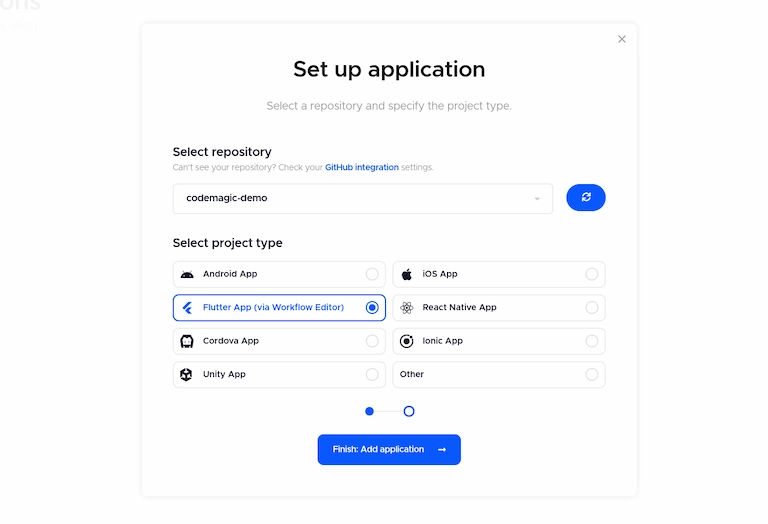
This is the place where you can customize all the settings to build your app.
Customize the build in codemagic
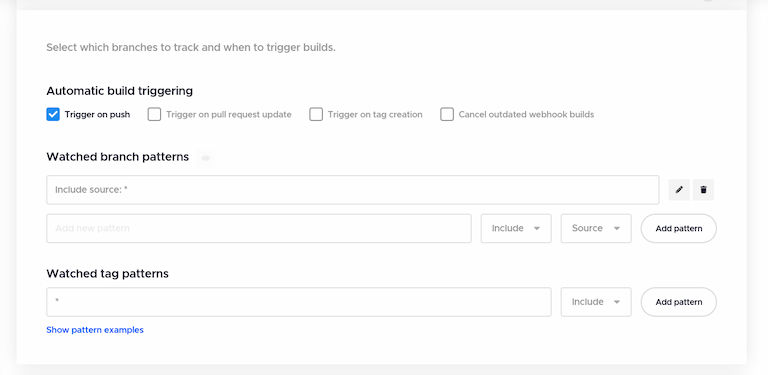
In the build trigger tab, click on the trigger on push. Now whenever you push to your main branch, a new build will take place.
In the watch branch pattern, you can choose your required branch. It can be main or your branch of choice.
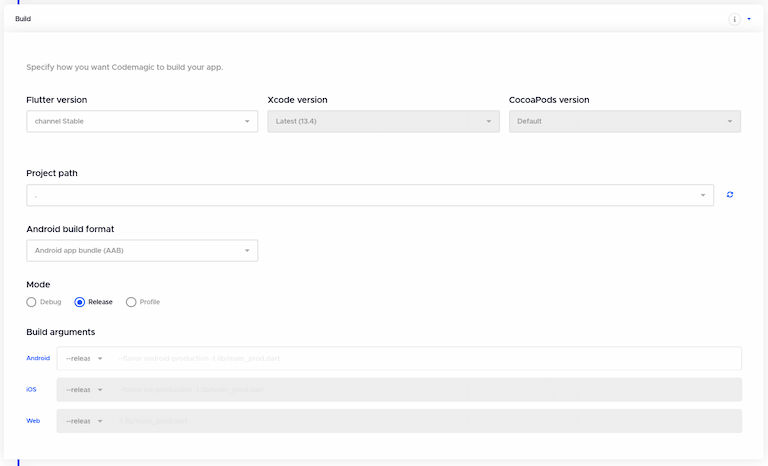
Inside the Tests tab, click on the Enable flutter test option.

Inside the Build tab, select Flutter version as Master. Choose release option inside mode parameter.
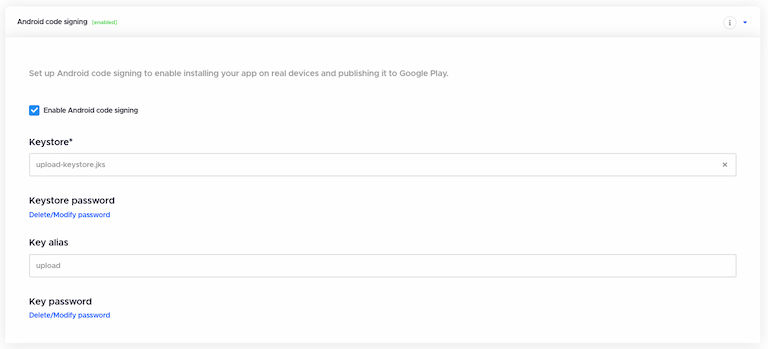
Inside the distribution tab, under android code signing, click on enable android code signing and upload the Keystore file. This Keystore file is generated while you are following the flutter build and release documentation in the previous step.
Now you have to add a Keystore password, key password, and an alias. Remember you have given all this information while creating the Keystore.
Now you are done. It is easy right. Just click on the start new build. Codemagic will pull the code from your GitHub repo and build the app on your behalf on their machine.
When the app will finish building, you can download the artifacts to test on your device.
I have covered only some surface-level details in this article. For more information, visit this official documentation.
Deploy to play store using codemagic CI/CD
Now, this is the last and the most interesting part of this article. Imagine you push your code to GitHub and a new version of your app will be built and deployed on the play store automatically. This seems magic, right? This is why it is called codemagic 😁.
Once you set up all these build and deployment workflows, All of the tedious tasks of building and releasing your app will be handled by codemagic.
To set up your play store for CI/CD, and create a new application in your google play console. Then upload an internal testing release to it. This is very important to do, otherwise, codemagic gives you error after error. I have learned this the hard way and I don’t want to go through the same pain.
Then follow these codemagic guides to set up all the required configurations. This is very elaborate and well-written documentation. Don’t skip anything. Just follow step by step.
After all the step is done, you will get a .json key from google cloud. Store it in a safe place. we need it later.
Then you can decorate your app store with a beautiful app icon, cover image, and some screenshots of the app.
If you published an app in the play store before, remember they (the play store guys) review every app before release. Until your app is not reviewed and accepted, you can only upload a draft release inside your google play console.
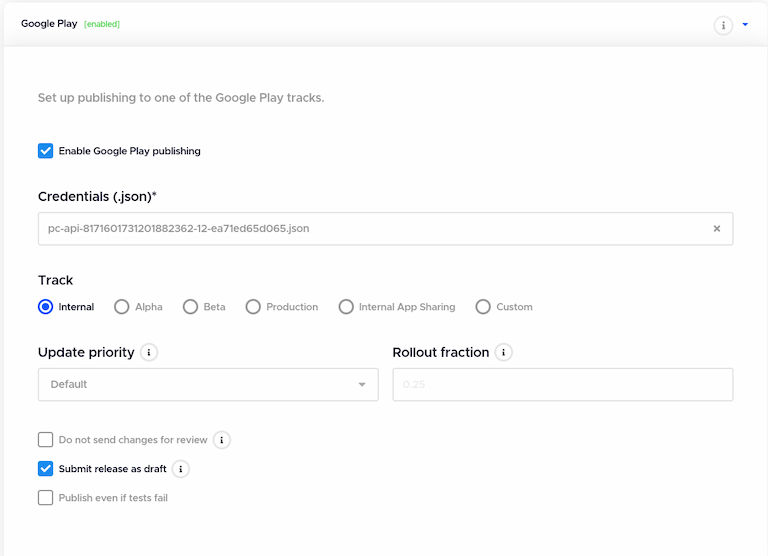
Now come back to the codemagic editor, and inside the distribution tab, you can see an option called google play. Click to enable google play to publish. Upload the JSON key you received from the above step.
Choose the track option carefully. As you are app is not reviewed yet. You can’t make a release. So for the time being, I choose the internal track. Then don’t forget to click on submit as a draft.
After your app is reviewed by them, you can choose any release track as per your choice and you can untick the submit as draft as an option.
After all these steps, this is the time to hit the Start new build button. Are you excited? me too.
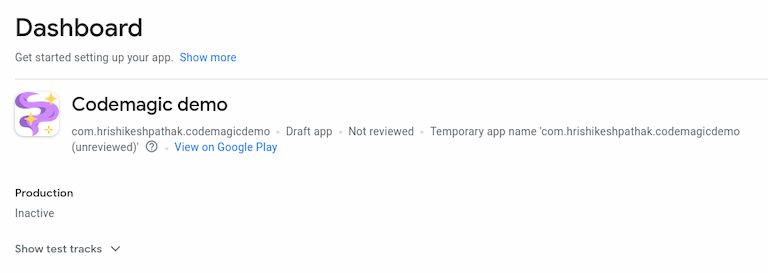
If all things go well, you can see something like this. Now your app will be submitted as a draft inside your play console.
Conclusion
Congratulation. You have done it. If you are following this far, then I have to say, you have a passion to learn. I feel glad that I can produce such long content that people read. If you have any problems and want to discuss something, ping me on Twitter.
Codemagic is such a useful tool if you are a small group or solo dev. It saves a lot of time for you. Do try it out and write your experiences. I will love to hear from you. Till then, bye and happy coding.