I don’t know about you, but I like Cloudflare workers to the extent that now this is my go-to tool for building APIs. Cloudflare enables us to run our application on the edge with very minimal configuration. Cloudflare stack consists of a javascript runtime (worker), Key value storage (Cloudflare KV), SQL database (Cloudflare D1), and an S3-compatible object storage (Cloudflare R2).
In this blog, you will learn how to use the Cloudflare D1 database with Cloudflare worker. We also use Drizzle ORM to make our Database queries typesafe.
Cloudflare D1: Sqlite Database running at the edge
As I have mentioned, Cloudflare D1 is a SQLite database running on the edge network of Cloudflare. It has a very generous free tier. Cloudflare D1 is a very good fit for your side projects and microservices.
Another interesting edge Database competing neck to neck with Cloudflare D1 is Turso. We will talk about Turso in some other blog. Stay tuned.
Drizzle: A typesafe ORM for Cloudflare D1
Drizzle is a typesafe ORM in Typescript. It has very good support for Cloudflare D1. Drizzle is fast and feels good to work with. It also allows you to write raw SQL whenever you need is a bonus.
Drizzle also comes with Drizzle-kit. Drizzle-kit is a CLI that converts drizzle schema into SQL syntax. When you modify the schema, Drizzle-kit also generates migration schema as well. I find drizzle is very productive and ergonomic for the development of typescript applications.
Setting up a Cloudflare worker project
To set up a new Cloudflare project, we will use Cloudflare CLI. As a prerequisite, you should have Nodejs and NPM installed on your computer.
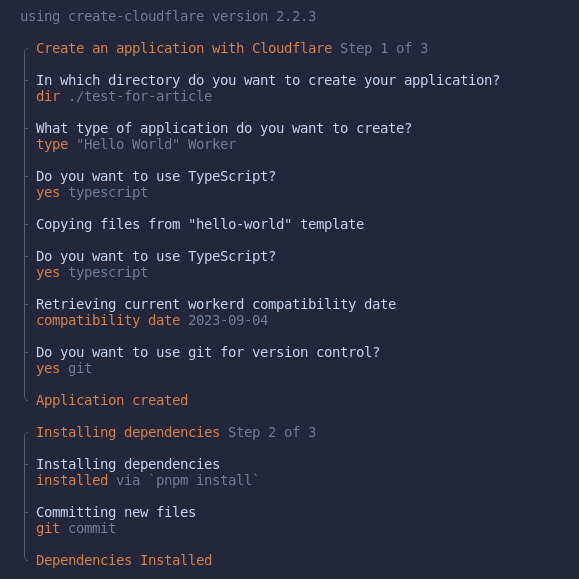
npm create cloudflare@latest
During project creation, select "Hello world" worker template. Please refer to this image to get an idea.
Now Let’s create a Cloudflare D1 database using Wrangler. If you have installed the wrangler CLI globally, you can use the following command to create a D1 database.
wrangler d1 create <DATABASE_NAME>
Otherwise, you can use the npx wrangler command to create a D1 database.
npx wrangler d1 create <DATABASE_NAME>
Now copy the database credentials from your terminal and paste them into the wrangler.toml file.
[[d1_databases]]
binding = "DB" # i.e. available in your Worker on env.DB
database_name = "email-worker"
database_id = "234wersd-f34t-34df-kj34-454352343434"
Finally, install drizzle-orm and drizzle-kit to use as a typesafe ORM in your project.
npm i drizzle-orm
npm i -D drizzle-kit
Define Database Schema using Drizzle ORM
Create a file schema.ts inside the src/ directory. There define the database schema using drizzle. In the example, I am defining an SQL table, which contains a list of Emails with a timestamp.
import { sqliteTable, text, integer } from 'drizzle-orm/sqlite-core';

export const emailList = sqliteTable('emaillist', {
    id: integer('id', { mode: 'number' }).primaryKey({ autoIncrement: true }),
    email: text('email').notNull(),
    timestamp: integer('date'),
});
If you want to change this schema as per your requirements, you can read drizzle documentation on SQL column type and cloudflare d1 reference.
To generate SQL from the schema.ts file, use drizzle-kit CLI. Add the following line in the scripts section in your package.json file.
{
    "scripts":{
        //...
        "generate": "drizzle-kit generate:sqlite --schema=./src/schema.ts",
        //...
    }
}
Now run npm run generate to generate the SQL file. The generated file will be stored in the drizzle/ directory.
Setting up Local Cloudflare d1 database for development
To start a local D1 database, run the wrangler d1 command with the generated SQL file.
npx wrangler d1 execute email-worker --local --file=./drizzle/0000_dry_logan.sql
Replace the email-worker with your database name defined in the wrangler.toml file. Also, point the --file argument to the generated SQL file.
Important: During development, always run the
wrangler d1command using the--localflag. If you omit the--localflag, the command will be applied in your production database.
Writing Database queries using Drizzle ORM
In this section, you will learn how to read and write data from the Cloudflare D1 database using Drizzle ORM. In this project, when a user makes a POST request to the /subscribe route, we parse the request and write the email address to the Database. Then we create a /subscriptions route to read all the email addresses present in the Database.
In the worker.ts file, first use the URL object to get the request path and method.
export default {
    async fetch(request: Request, env: Env, ctx: ExecutionContext): Promise<Response> {
        const url = new URL(request.url);
        if (url.pathname === '/subscribe' && request.method === 'POST') {
            return await subscribe(request, env);
        } else if (url.pathname === '/subscribers' && request.method === 'GET') {
            return await getAllSubscribers(env);
        }
        return jsonResponse({ msg: 'hello world' });
    },
};
Now setting up the Cloudflare d1 to work with drizzle-orm.
import { drizzle } from 'drizzle-orm/d1';
import { emailList } from './schema';

export interface Env {
    DB: D1Database;
}
Let’s define the subscribe function. Here we parse the POST request to the /subscribe route, which contains an email address, and write the email into our D1 database using drizzle-orm.
async function subscribe(request: Request, env: Env): Promise<Response> {
    const formdata = await request.formData();
    const email = formdata.get('email');
    const timestamp = Date.now();
    const db = drizzle(env.DB);
    const result = await db
        .insert(emailList)
        .values({
            email: email,
            timestamp: timestamp,
        })
        .returning();
    return new Response(JSON.stringify(result),{
        headers: {'Content-Type': 'application/json;charset=UTF-8' },
        status: 200,
    });
}
Similarly, write the getAllSubscribers function to respond to the GET request to the /subscribers route.
async function getAllSubscribers(env: Env) {
    const db = drizzle(env.DB);
    const result = await db.select().from(emailList);
    return new Response(JSON.stringify(result),{
        headers: {'Content-Type': 'application/json;charset=UTF-8' },
        status: 200,
    });
}
As you can see, running database queries using drizzle-orm is very intuitive and easy. You can read this drizzle CRUD documentation to get more insights.
Running database migration using Drizzle-kit and Wrangler
Assume you want to make some changes in the database. Drizzle makes it very easy for you.
First, change your schema.ts file and edit the schema. For example, I am adding a name field to store user names along with their emails in the emaillist table.
import { sqliteTable, text, integer } from 'drizzle-orm/sqlite-core';

export const emailList = sqliteTable('emaillist', {
    id: integer('id', { mode: 'number' }).primaryKey({ autoIncrement: true }),
    email: text('email').notNull(),
    name: text('name)
    timestamp: integer('date'),
});
Then add migration_table name and migration_dir parameter in your wrangler.toml file. In this case migration_table is emaillist and migration_dir is drizzle as all the migration files are stored in the drizzle directory.
[[d1_databases]]
binding = "DB" # i.e. available in your Worker on env.DB
database_name = "email-worker"
database_id = "234wersd-f34t-34df-kj34-454352343434"
migration_table = "emaillist"
migrations_dir = "drizzle"
Before running the actual migration, first, see the list of migrations that need to be applied in your database.
npx wrangler d1 migrations list newsletter-worker --local
If you want to apply all the migrations from the list, run the following command to apply database migration to your local D1 database.
npx wrangler d1 migrations apply newsletter-worker --local
Now you can use the name column in your local Cloudflare D1 database.
Configuring Remote Cloudflare D1 database
After you complete your development process, you should configure the remote (or production) Cloudflare D1 database. The commands to create and migrate the remote database are the same except you need to remove the --local flag from every command.
First, create the emaillist table on the remote database.
npx wrangler d1 execute email-worker --file=./drizzle/0000_dry_logan.sql
Then add database migrations. The first command list what migrations are to be applied and the second command apply the migration to the remote database.
wrangler d1 migrations list newsletter-worker
wrangler d1 migrations apply newsletter-worker
After you follow these steps, your Cloudflare D1 database is ready to accept requests from your Cloudflare worker script.
Deploy your application at the edge
Deploying your Cloudflare Worker is straightforward. You just need to run wrangler deploy to deploy your application. If you haven’t logged in to your Cloudflare dashboard, first wrangler will do an authentication step and then deploy your application.
npx wrangler deploy
Conclusion
Using Cloudflare D1 with Worker is a very easy and fast method to rapidly build and deploy a REST API endpoint. Drizzle helps to make typesafe database queries. If you like this type of informative blog, consider subscribing. Also if you find any value from this blog, please share with your followers. Your kind gesture meant a lot to me. Keep Learning.